Introduction to 3D Printing
#6: Learn about FDM and SLA 3D printers and typical printing settings
Hello readers,
The utilization of 3D printing in many aspects of building, manufacturing, and tech has been growing more each day. From 3D printed concrete houses to bioprinters, people are figuring out new ways to use these tools for new and exciting things.
There are a few different types of these machines, based on what methods and materials they use. Printers can extrude material, cure resin with a light source, or fuse powdered material together with binders, electrons, and lasers. With all of these options, the two most common types of 3D printers that you may have access to are FDM and SLA printers.
FDM (Fused-Deposition Modeling)
FDM printers are the main type of desktop printer in use. You may have seen them on tv, in your local library, or maybe at your school.
How FDM works
The printer’s nozzle and hotend will heat up until it reaches the correct temperature for the selected filament. Then it will start creating lines of melted material at the programmed positions and thickness. This repeats for each layer until the model is complete. Printed objects are post-processed by removing rafts and support material with snipping tools and sandpaper. Wear working/cutting gloves to protect yourself from the sharp material during this step.
SLA (Stereolithography)
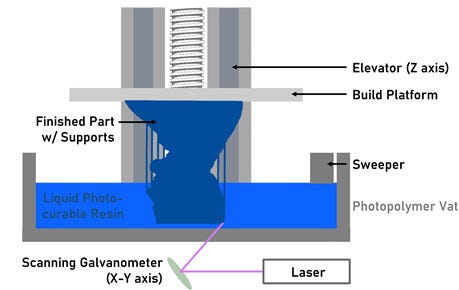
SLA printers create models made of hardened resin and often print upside-down. They can achieve more accurate details and smaller layer heights than FDM printers.
How SLA works
The printer will warm up and make sure there is enough resin in the vat. Then the platform will dip into the resin, where a laser will cure the resin as specific points to create the first layer of the model or the supports. Next, the platform raises out of the bed, the sweepers slides across the resin, and then the build platform lowers into the resin again to create the next layer. This process repeats until the model is complete. When the model is removed from the build platform, excess resin is cleaned off in an isopropyl alcohol bath, and then it is put in a UV chamber to further cure the resin.
How do the printers know what to do?
3D printers need to be given a set of instructions in order to know what paths to take, how hot the extruder and platform need to be, etc.
To create the instructions:
First download a 3D model or create one in Fusion 360. Save it onto your computer as a .STL file
Load the .STL file into a slicing software such as Cura or PrusaSlicer
Select the build platform size for your printer (or pick a random printer’s sizes if you don’t have one)
Make sure that the model fits on the platform, is oriented the correct way, and is the desired size
These can all be modified by selecting the model on the screen and then using the orientation and sizing tools to rotate, resize, etc
Next, select the correct color and type of material, so the software can estimate the correct build temperatures. ABS and PLA are good materials to use
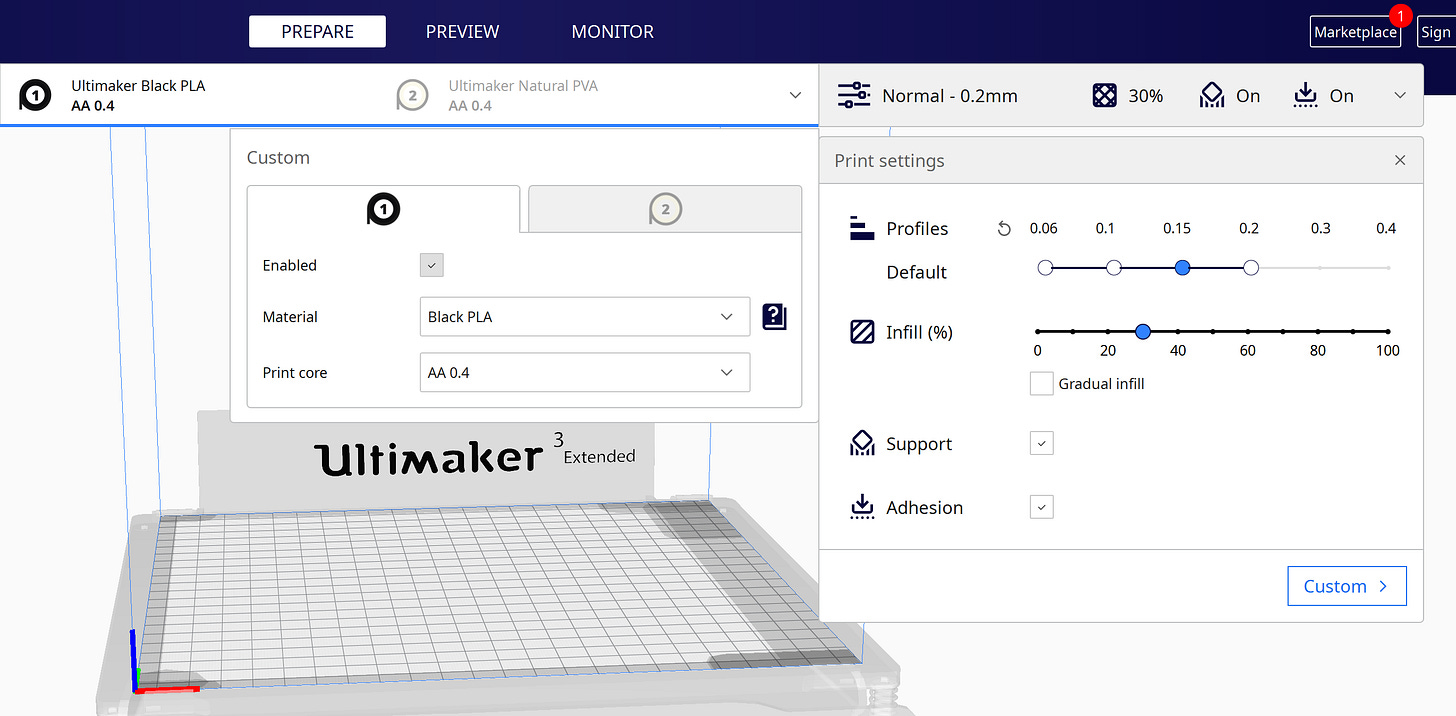
Now you’ll have to make some decisions. Most slicing programs will first give you simplified settings to choose from. I would recommend using those as you first get started and then using custom settings if you notice printing issues such as warping or poor platform adhesion.
Profiles / Quality / Layer Height
Typical heights are between 0.1mm and 0.2mm for FDM printing
0.1mm layers will take longer to print, but the model will have a smoother surface
0.2mm is typically used for a quicker prototype print
Infill
Determines what percentage of material is inside the printed object
Higher percentage of infill = more solid object, but uses more material and time
I would recommend using 30% for a normal print, but select the percentage based on your project’s needs
Support
Sometimes your project will have overhanging shapes with angles that will cause the melted material to drape/drip
Turning on support materials will tell the program to build a thin, removeable, scaffolding that will allow those overhangs to form properly
Adhesion
Prevents the model from breaking off of the platform mid-print or from warping upwards at the base’s corners
A brim makes the bottom layer of material larger than your model and prevents warping. Similar to the brim of a hat
A raft adds layers of material below your model, so it doesn’t come in contact with the platform. This can be removed later on
A skirt makes a line around your model, and doesn’t touch it, to extrude some material before your first layer
The option to pick one of these is sometimes found in custom settings
Below are the custom settings available in Cura.
Once you’ve selected your desired settings, you can preview the slicing and move the slider to see each layer, as well as the inside of the model.
The final step is to download the printing file (G-code file) to your computer, a USB, or an SD card, based on how you connect to your printer. Also, save the slicer file onto your computer by clicking file, then save, at the top left of the window. This allows you to go back into the file and make quick changes to your project at any time.
Exercise
Create a 3D model or download something you like from Thingiverse
Download a slicing software such as Cura or PrusaSlicer
Load the .STL file into the software and play with the settings to see how they change the position, size, density, quality, time, amount of material, etc. in the virtual print simulation
Please feel free to reply to this email, comment on the post, or share it with your friends.
All the best,
Julie


